🚀 Introduction
Starting with Google Ads can feel overwhelming — but it doesn’t have to be!
Whether you’re a small business owner, marketer, or freelancer, this guide will walk you through how to set up your first Google Ads campaign the right way, even if you have zero experience.
✅ Step-by-Step: How to Set Up Your First Google Ads Campaign
🟢 Step 1: Create a Google Ads Account
- Visit ads.google.com
- Sign in with your Google account
- Click “Start Now”
✅ Tip: You can skip “Smart Mode” and switch to Expert Mode for full control (recommended).
🟢 Step 2: Choose Your Campaign Goal
Select what you want to achieve:
- Sales – for eCommerce or product websites
- Leads – for service businesses, forms, or calls
- Website Traffic – to drive visitors to your site
- Or choose “Create a campaign without a goal’s guidance” for flexibility
🟢 Step 3: Choose Campaign Type
Choose where your ads will appear:
| Campaign Type | Best For |
|---|---|
| Search | Text ads on Google Search results (high intent) |
| Display | Visual/banner ads on websites and apps |
| Video | YouTube ads |
| Performance Max | All-in-one smart campaign across Search, YouTube, Display, etc. |
| Shopping | Product-based ads for eCommerce (via Merchant Center) |
For beginners, start with Search Campaign to get leads or sales from search intent.
🟢 Step 4: Set Up Campaign Settings
- Campaign Name: (e.g., “Search – Yoga Classes – Mumbai”)
- Networks: Uncheck Display Network to avoid irrelevant clicks
- Locations: Target your service area (country, city, or radius)
- Languages: Choose the language your audience speaks (e.g., English)
🟢 Step 5: Set Budget and Bidding
- Daily Budget: Start small (₹500–₹1000 per day)
- Bidding Strategy:
- Maximize Conversions (recommended for beginners)
- Optional: Add a Target CPA if you know how much a lead/sale is worth
🟢 Step 6: Add Ad Extensions (Assets)
Boost your visibility with:
- Sitelinks – links to other important pages
- Callouts – extra text like “Free Shipping”
- Calls – add your phone number
- Location – show your address via Google My Business
🟢 Step 7: Create Ad Groups and Add Keywords
Group similar keywords together in Ad Groups (e.g., “Yoga for Beginners”, “Online Yoga Classes”).
Use Google’s Keyword Planner to find terms people are searching for.
Example keywords:
- [yoga classes near me]
- “online yoga classes”
- yoga training mumbai
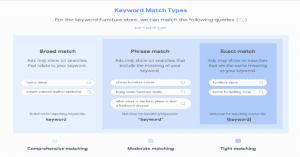
Use a mix of:
- Exact match: [yoga classes near me]
- Phrase match: “yoga classes”
- Broad match: yoga training
🟢 Step 8: Write Your Ads
Each text ad includes:
- 3 Headlines (up to 30 characters each)
- 2 Descriptions (up to 90 characters each)
- Final URL (the landing page people visit)
🧠 Tips:
- Include your main keyword in the headline
- Add a call-to-action like “Sign Up Now” or “Book Free Trial”
- Mention USPs like “Certified Trainers” or “24/7 Support”
🟢 Step 9: Review and Launch
✔️ Double-check:
- Your budget and bids
- Keywords and targeting
- Ads and final URLs
- Conversion tracking (if set)
Then click “Publish Campaign”.
Your ads will go under Google’s review and go live once approved (usually within 24 hours).
📊 Bonus Tips for Success
- Use negative keywords to block irrelevant clicks (e.g., “free”, “jobs”)
- Install conversion tracking via Google Tag or GA4
- Start small and optimize weekly
- Track key metrics like CTR, CPC, and conversions
- Test 2–3 ad variations in each ad group
🧠 Final Thoughts
Your first Google Ads campaign is just the beginning. Once you go live, Google collects valuable data — and you’ll learn what works best for your goals.
🎯 Focus on keywords that convert, write strong ads, and keep refining your strategy.

Pingback: What is Search Engine Marketing?